Gatherer Forager
Stinging Nettle
Stinging Nettle
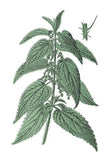
Stinging Nettle, a perennial plant reaching up to 100cm, contains stinging hairs that can cause discomfort when touched. However, these hairs can be neutralized by drying or cooking. Its fast growth and nutritional benefits make it a popular choice in gardens, attracting butterflies and repelling flies.
Be mindful when you plant that it can become weedy so will need to be controlled harvest before seeding to avoid spreading.
500 seeds
Sorry not to W.A due to biosecurity restrictions
Share
I need a bed of needles in my garden to make the best fertilizer I have ever encountered. I used 2 pairs of gloves over my plastic gloves (and a long sleeved top) to do the harvesting so that my hands and arms were not "stung".
Harvest nettle leaves early in the morning where there has been no rain and no dew on the leaves.
Do not "wash" the leaves in any way and do NOT collect in a bucket that has any moisture in the bucket.
In week ONE harvest the equivalent of one bucket of nettle leaves from the freshest newest leaves at the top.
Do not try to push those leaves down. One bucket initially is all you need.
To then layer those leaves in a bucket you put a layer of about 7cm of nettle tips with very scant amount of brown sugar on top - such that you can still see the leaves. (NO water).
Do not try to push the leaves down lower
Then repeat with the next layer as above.
Continue laying down the leaves as above until it results in about 6 layers in the one bucket.
Store the bucket in a cool sheltered place and covered with cheese cloth on top.
ONE WEEK later collect bucket two of fresh new nettle leaves. Add the new leaves to bucket one that has been waiting as above. (the week before leaves stay in the bucket but are much lower in the bucket now after one week).
Do not stir up group one - leave it where it is and add group two on top of group two nettle leaves - add as before with a scant amount of brown sugar.
Simply add the group two leaves as you did earlier on top of group one - layering group two also with a very light amount of the brown sugar between each layer.
Week three - again collect one bucket of fresh nettle leaves - only newest and freshest.
AGAIN layer the new group three on top of group two and group one.
Then wait 2 weeks.
Now you need a new empty clean all dry bucket. Place a large piece of new cheese cloth over the bucket and allow the middle to dent down about 20 cm into the final bucket and secure it tightly around the outer edge of the bucket.
Tip the green mass of the leaves that have been in the final bucket into a well of new cheese cloth.
Cover the top with a lid of some description and leave the fluid to seep down through the cheese cloth for 7 to 10 days.
At the end you can twist the cheese cloth and attempt to squeeze out any more of the liquid.
The amount of liquid produced seems disappointing (but it is ALL GOOD at this stage.)
Discard the tight green mass left into your compost heap - it will be happy there,
Do NOT dilute the eventual thick liquid once made and stored in glass containers with screw on lids UNTIL one teaspoon is needed.
Store in a dark cool place - but NOT in the fridge.
To USE the nettle fertilizer:
It is ONLY when you remove ONE teaspoon of the mixture that you then dilute that ONE teaspoon into the correct ratio of water - I used rain water.
Thus dilute ONE teaspoon of the nettle juice into the equivalent of 500 teaspoons of water.
NEVER use it without diluting 1:500 as it is a very strong "pep up" for plants of all description.
Keep storing the remainder of the nettle tonic in the screw top jar in a cool dry place out of sunlight but NOT in the fridge until you need another ONE teaspoon of it.
My ailing rhododendron perked up and is now happy with new foliage as well.
Thank you Gatherer Forager for stocking the seeds of nettles so that I can create more of this wonderful mixture for my garden.
I did have a lovely bed of nettles but the lawn-mower guy removed them as he thought they were weeds at the back of my garden. He knows now that nettles are NOT weeds.
Hence why I urgently needed nettle seeds.
Seed came .. I plant it.. waitting grows 😬